


How to Send and Receive Emails in Cloudflare: A Complete Guide
In today’s digital landscape, effective email communication is crucial for businesses and individuals alike. If you’re using Cloudflare for your website’s DNS management and wondering how to send and receive emails, you’ve come to the right place. In this guide, we’ll walk you through the step-by-step process of setting up email services with Cloudflare, ensuring you never miss an important message. Whether you’re new to Cloudflare or just need a refresher, this guide will help you seamlessly manage your email flow.
Setting up email through Cloudflare can be a bit technical, but it’s a great way to ensure your emails are delivered securely and reliably. If you prefer, I offer a professional service to configure Cloudflare for sending and receiving emails, so you can focus on your business. However, if you enjoy a hands-on approach, this guide will walk you through the process step by step, allowing you to do it yourself with confidence.
Understanding Cloudflare’s Role in Email Management
Before diving into the setup process, it’s essential to understand how Cloudflare interacts with email services. Cloudflare primarily focuses on website performance, security, and DNS management. While Cloudflare itself does not host email services, it can significantly improve email delivery by protecting your domain from attacks and managing your DNS records efficiently.
Why Cloudflare Doesn’t Host Emails
Cloudflare’s infrastructure is designed for speed and security, which is why it doesn’t host emails directly. However, you can still manage your email DNS records (MX, SPF, DKIM) through Cloudflare to ensure secure and reliable email delivery.
How DNS Settings Impact Email Delivery
Correct DNS settings are critical for proper email delivery. Misconfigured DNS records can lead to emails not reaching their destination or getting marked as spam. Cloudflare allows you to manage these records, ensuring they are correctly configured for your email provider.
How to Add a Website to Cloudflare:
Cloudflare is a powerful tool for improving website performance, security, and reliability. Whether you’re looking to boost your site’s speed, protect it from cyber threats, or manage your DNS settings more effectively, Cloudflare offers a robust solution. In this guide, we’ll walk you through the process of adding your website to Cloudflare. Whether you’re a seasoned developer or a beginner, this step-by-step guide will help you get the most out of Cloudflare’s features.
Why Add Your Website to Cloudflare?
Before we dive into the technical steps, it’s important to understand why integrating Cloudflare with your website is beneficial.
Enhanced Website Security
Cloudflare provides an additional layer of security by protecting your site from Distributed Denial of Service (DDoS) attacks, malicious bots, and other online threats. By routing your traffic through Cloudflare, you can safeguard your website from various cyber risks.
Improved Website Performance
Cloudflare’s global Content Delivery Network (CDN) ensures that your website loads quickly for users all over the world by caching content at data centers close to your visitors. This significantly reduces load times, providing a better user experience.
Reliable DNS Management
Cloudflare offers fast and reliable DNS management, which helps in reducing downtime and ensures that your website remains accessible at all times. With a simplified dashboard, managing DNS records becomes much easier.
.
Step-by-Step Guide to Adding Your Website to Cloudflare
Now that you know why Cloudflare is a great addition to your website, let’s walk through the process of adding your site to Cloudflare.
How to Add a Website to Cloudflare
Sign Up for a Cloudflare Account
The first step is to create a Cloudflare account if you don’t already have one.
- Visit the Cloudflare website and click on the Sign Up button.
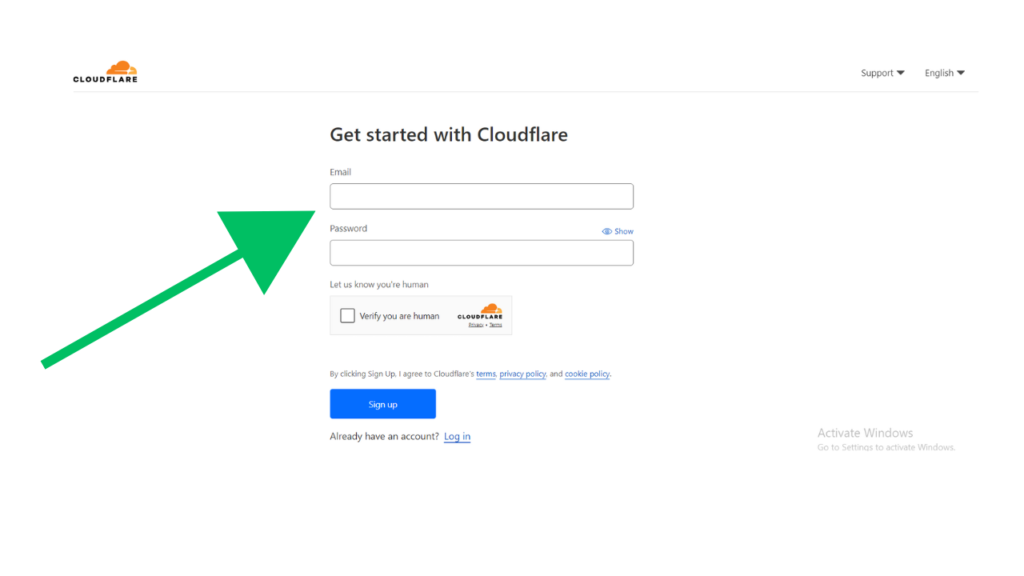
- Enter your email address and create a password.
- Click Create Account to proceed.
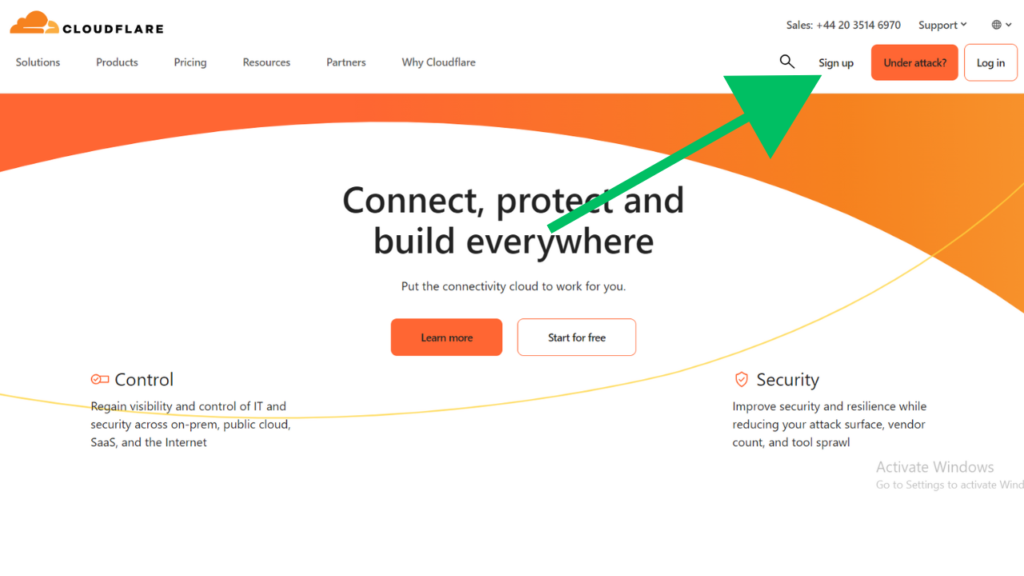
Sign up to Cloudflare
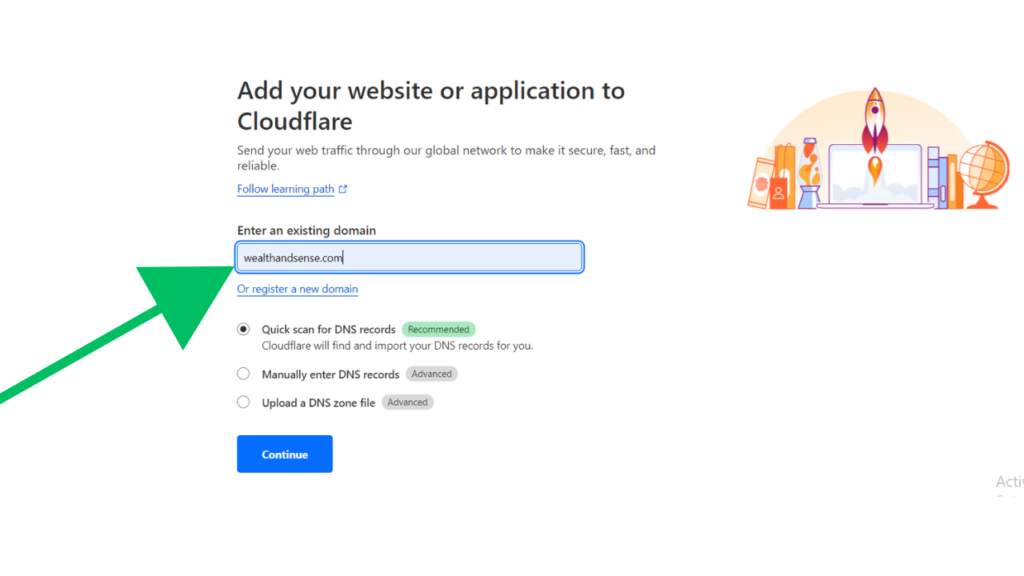
2. Add Your Website to Cloudflare
Once your account is set up, you’ll be prompted to add your website.
- After logging in, click on Add a Site on your Cloudflare dashboard.
- Enter your website’s URL (e.g.,
www.yourdomain.com) and click Add Site.
3. Choose a Cloudflare Plan
Cloudflare offers a variety of plans ranging from free to enterprise-level. For most users, the free plan offers sufficient features, including DDoS protection, CDN, and basic security.
- Select the plan that best suits your needs and click Continue.

4. Review DNS Records
Cloudflare will automatically scan your existing DNS records and display them for your review.
- Ensure that all necessary records (A, CNAME, MX, etc.) are correctly listed.
- If you need to add any records manually, this is the time to do so. Click Add Record if required.
- Once reviewed, click Continue.
5. Update Your Domain’s Nameservers
To activate Cloudflare, you need to point your domain’s nameservers to Cloudflare’s nameservers.
- Cloudflare will provide you with two nameservers.
- Log in to your domain registrar’s account (e.g., GoDaddy, Namecheap).
- Replace your existing nameservers with the ones provided by Cloudflare.
- Save the changes.
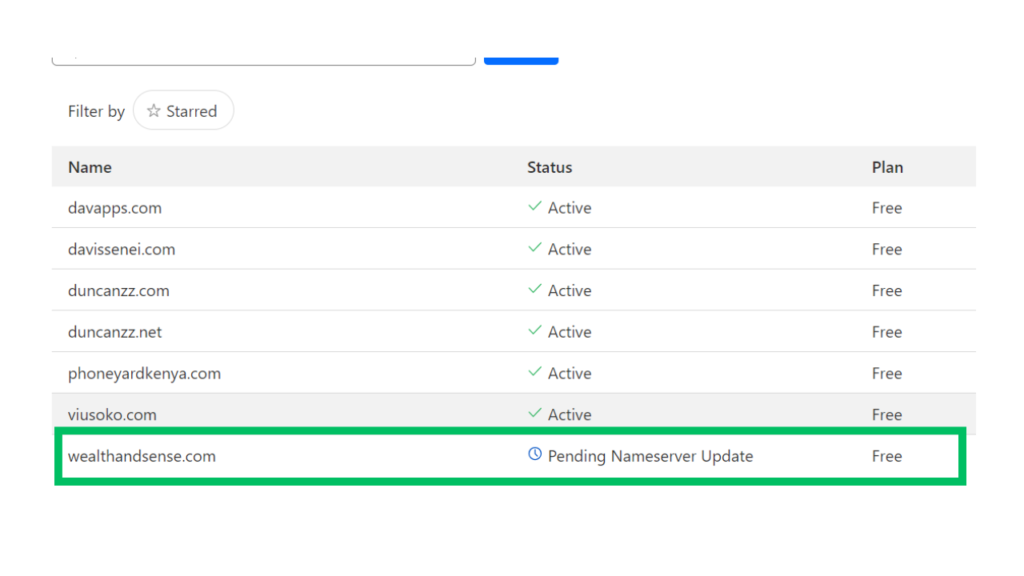
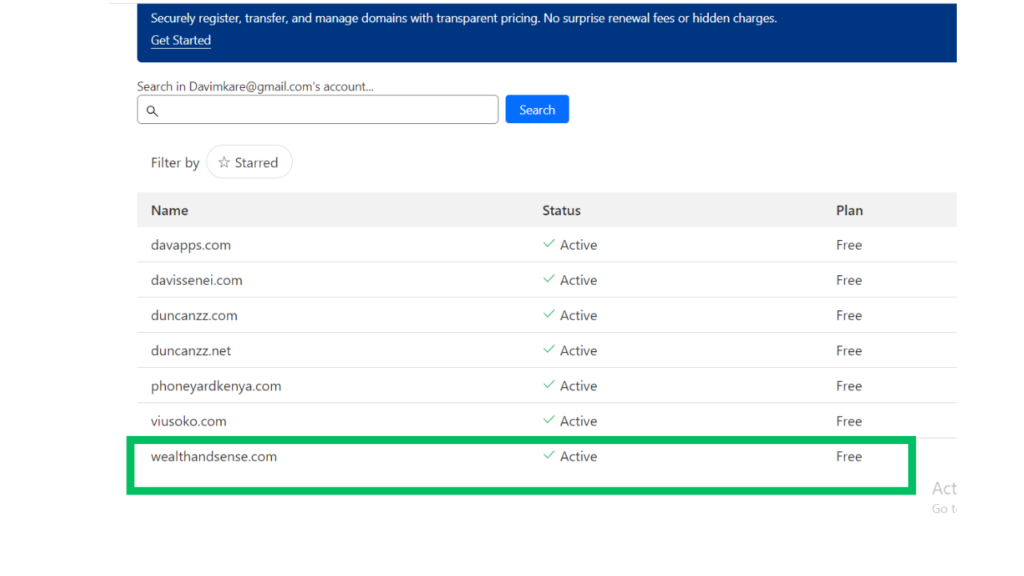
Nameserver changes can take up to 48 hours to propagate, but it typically happens much faster.
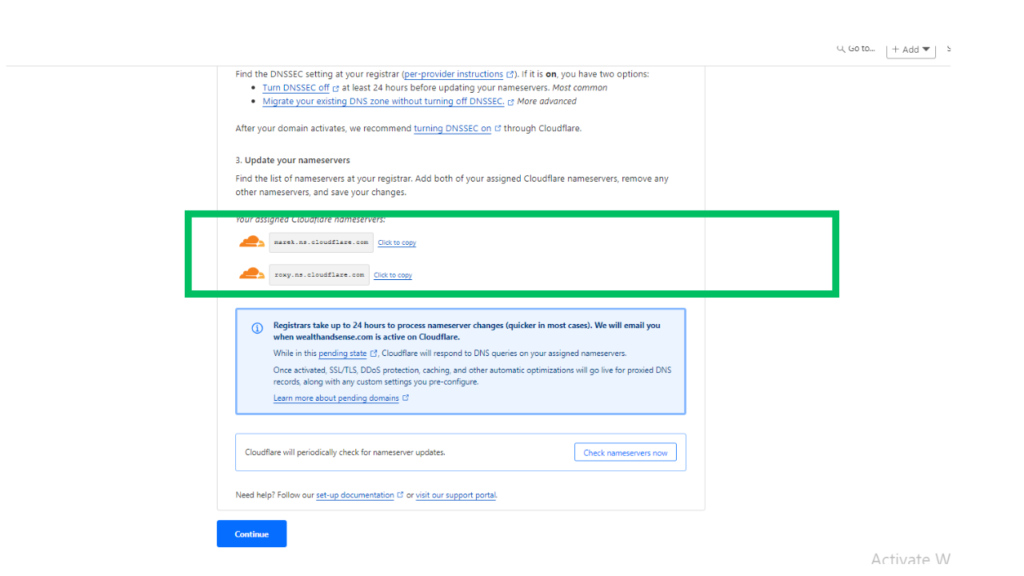
Replace The names with cloudflare Name Servers

6. Configure Cloudflare Settings
Once your nameservers are updated and your domain is active on Cloudflare, you can configure various settings:
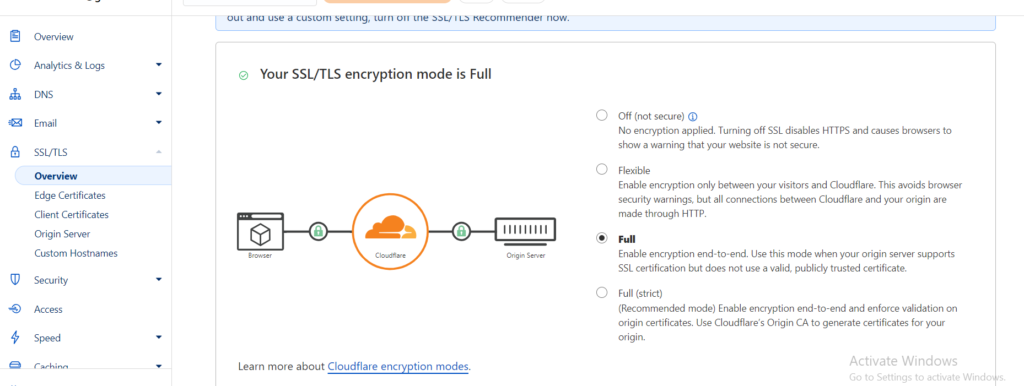
- SSL/TLS: Choose the level of encryption (Flexible, Full, or Full (Strict)) depending on your website’s needs.
- Security: Adjust security levels, firewall rules, and bot management.
- Performance: Enable features like Auto Minify, Brotli compression, and Rocket Loader to optimize site performance.
Troubleshooting Common Issues When Adding a Website to Cloudflare
While adding a website to Cloudflare is generally straightforward, you might encounter some challenges. Here’s how to address common issues:
DNS Propagation Delays
If your site doesn’t seem to be active on Cloudflare, it might be due to DNS propagation delays. This can take a few hours. You can check the status using tools like DNSChecker.
Mixed Content Warnings
If your website is not fully secured after enabling SSL, you might see mixed content warnings. This occurs when your site contains both HTTP and HTTPS elements. Ensure all links and resources are served over HTTPS to resolve this issue.
Site Downtime After Nameserver Change
If your site experiences downtime after changing nameservers, double-check your DNS records. Ensure all necessary records are present and correctly configured in Cloudflare.
Adding your website to Cloudflare is a crucial step in enhancing its performance, security, and reliability. By following the steps outlined in this guide, you can ensure that your site is protected and optimized for speed, providing a better experience for your users. If you encounter any issues or need further assistance, feel free to reach out to us for expert support.
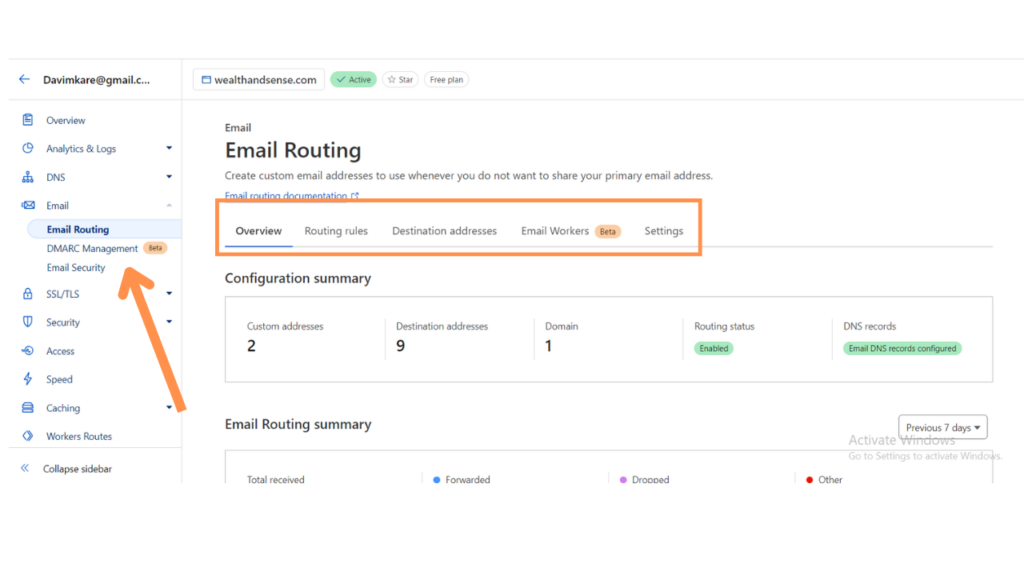
How to Configure Emails in cloudflare
How To Add Business Emails In Cloudflare
Understanding Cloudflare’s Role in Email Management
Before diving into the setup process, it’s essential to understand how Cloudflare interacts with email services. Cloudflare primarily focuses on website performance, security, and DNS management. While Cloudflare itself does not host email services, it can significantly improve email delivery by protecting your domain from attacks and managing your DNS records efficiently.
Why Cloudflare Doesn’t Host Emails
Cloudflare’s infrastructure is designed for speed and security, which is why it doesn’t host emails directly. However, you can still manage your email DNS records (MX, SPF, DKIM) through Cloudflare to ensure secure and reliable email delivery.
How DNS Settings Impact Email Delivery
Correct DNS settings are critical for proper email delivery. Misconfigured DNS records can lead to emails not reaching their destination or getting marked as spam. Cloudflare allows you to manage these records, ensuring they are correctly configured for your email provider.
Step-by-Step Guide to Sending and Receiving Emails Using Cloudflare
Setting up your email to work with Cloudflare involves a few key steps. Here’s how you can do it:
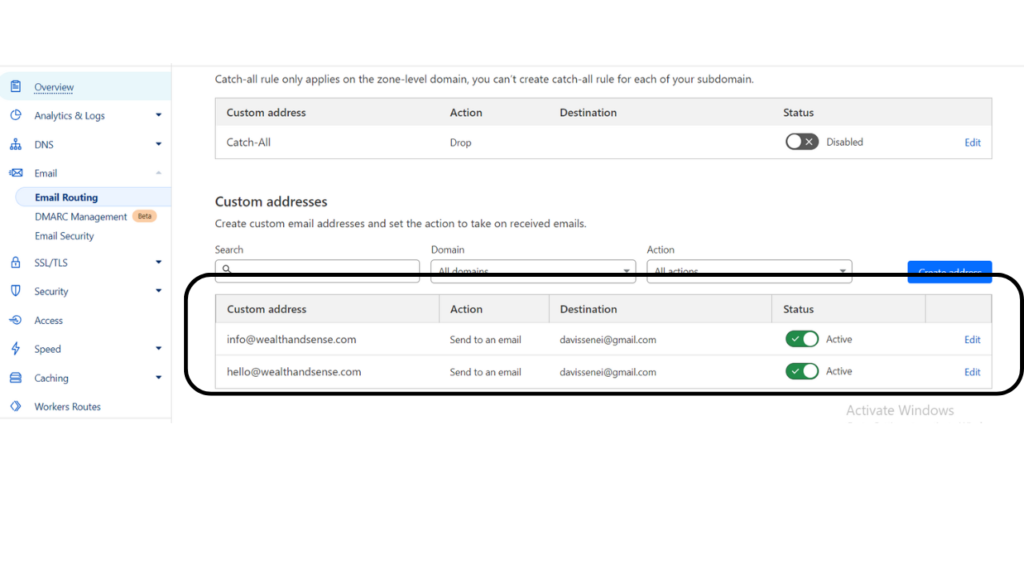
1. Configuring MX Records in Cloudflare
MX (Mail Exchange) records direct email to your mail server. Here’s how to set them up in Cloudflare:
- Log in to your Cloudflare account and select your domain.
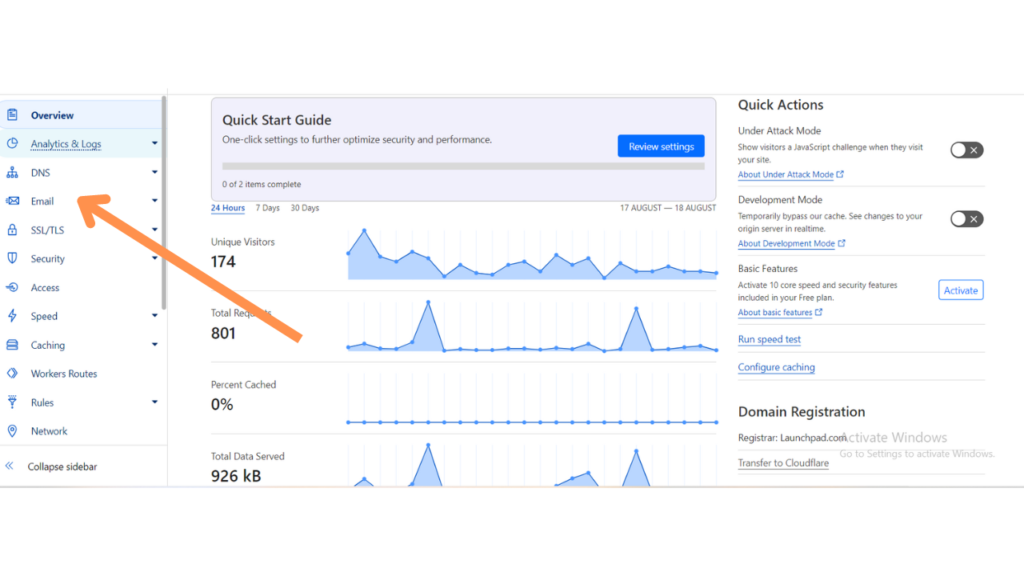
- Go to the DNS tab.
- Scroll down to DNS Management and click on Add Record.
- Choose MX from the type dropdown.
- Enter your email provider’s server address (e.g.,
mail.yourdomain.com). - Set the priority according to your email provider’s instructions.
- Save the record.
2. Adding SPF, DKIM, and DMARC Records
SPF, DKIM, and DMARC records are crucial for authenticating your emails and preventing them from being marked as spam.
SPF Record: This record specifies which servers are allowed to send emails on behalf of your domain. To add it:
- Add a new TXT record in the DNS section.
- Set the name to
@and paste the SPF record provided by your email service. - Save the record.
DKIM Record: DKIM adds a digital signature to your emails. To set this up:
- Add a new TXT record.
- Set the name to
default._domainkey(or as specified by your email provider). - Paste the DKIM key provided by your email service.
- Save the record.
DMARC Record: This helps monitor and enforce SPF and DKIM policies.
- Add a new TXT record.
- Set the name to
_dmarc. - Enter the DMARC policy (e.g.,
v=DMARC1; p=none; rua=mailto:[email protected]). - Save the record.
3. Verifying Your Email Setup
After adding these records, it’s important to verify that your email setup is correct. You can do this by:
- Sending test emails to ensure they are received without issues.
- Using tools like MXToolbox to check if your DNS records are correctly configured.
Troubleshooting Common Issues with Cloudflare Email Integration
Even with the right setup, issues can arise. Here’s how to address some common problems:
Emails Not Sending or Receiving
If your emails aren’t being delivered, check the following:
- Ensure that your MX records are pointing to the correct mail server.
- Verify that your SPF, DKIM, and DMARC records are correctly configured.
- Make sure your mail server’s IP isn’t accidentally being proxied through Cloudflare (orange cloud icon). Email traffic should bypass Cloudflare’s proxy.
Emails Landing in Spam
Emails landing in the spam folder can be due to misconfigured authentication records. Double-check your SPF, DKIM, and DMARC settings. Additionally, review your email content for any spammy elements.
Managing emails through Cloudflare may seem daunting at first, but with the right configuration, it can enhance your email security and deliverability. By properly setting up your MX, SPF, DKIM, and DMARC records, you ensure that your emails are routed correctly and securely. If you encounter any issues, the troubleshooting tips provided in this guide should help you resolve them quickly.
Looking to optimize your Cloudflare email setup or need professional assistance? Contact us today for expert support!
How to Use Brevo (formerly Sendinblue) as an SMTP to Send and Receive Emails
Email communication is essential for any business, and using a reliable SMTP (Simple Mail Transfer Protocol) service ensures that your emails are delivered effectively. Brevo, formerly known as Sendinblue, offers a powerful SMTP service that allows you to send and receive emails securely and efficiently. In this guide, we’ll walk you through the steps to configure Brevo as your SMTP server, whether you’re integrating it with your website, CRM, or any other platform. This step-by-step guide will help you leverage Brevo’s robust email infrastructure to enhance your communication efforts.
Why Choose Brevo for Your SMTP Needs?
Before we dive into the technical setup, it’s important to understand why Brevo is an excellent choice for SMTP services.
Reliable Email Delivery
Brevo offers high deliverability rates, ensuring that your emails reach your recipients’ inboxes rather than getting lost in spam folders. This reliability makes it a preferred choice for businesses of all sizes.
Scalable Email Solutions
Whether you’re sending a few emails a day or managing large-scale email marketing campaigns, Brevo scales to meet your needs. With its robust infrastructure, you can send transactional emails, newsletters, and more without any hiccups.
Comprehensive Analytics and Reporting
Brevo provides detailed analytics and reporting, allowing you to track email performance, monitor delivery rates, and optimize your campaigns based on real-time data.
Step-by-Step Guide to Setting Up Brevo as Your SMTP Server
Setting up Brevo as your SMTP server is straightforward. Follow these steps to get started:
1. Sign Up for a Brevo Account
If you haven’t already, the first step is to create a Brevo account.
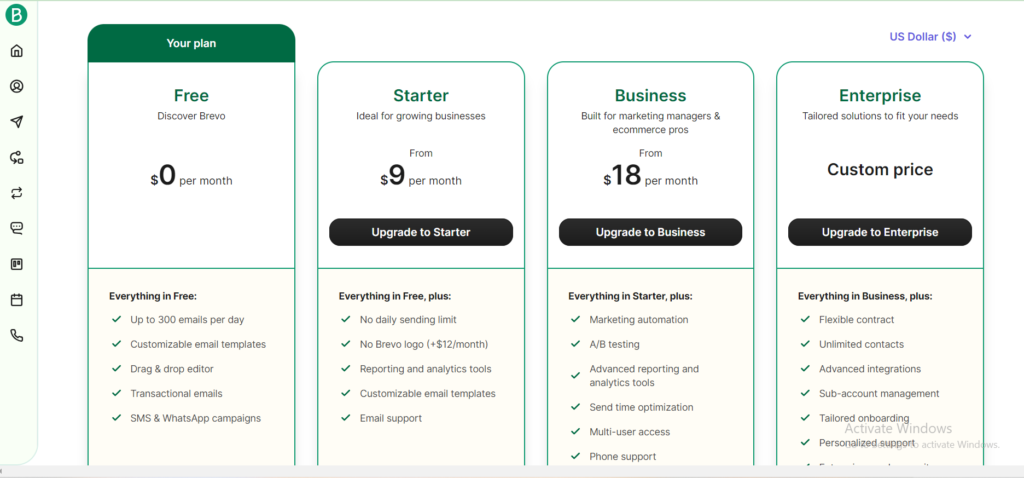
- Visit the Brevo website and sign up for an account.
- Choose the plan that best suits your needs. The free plan offers limited features, while the paid plans provide more robust options, including higher sending limits.
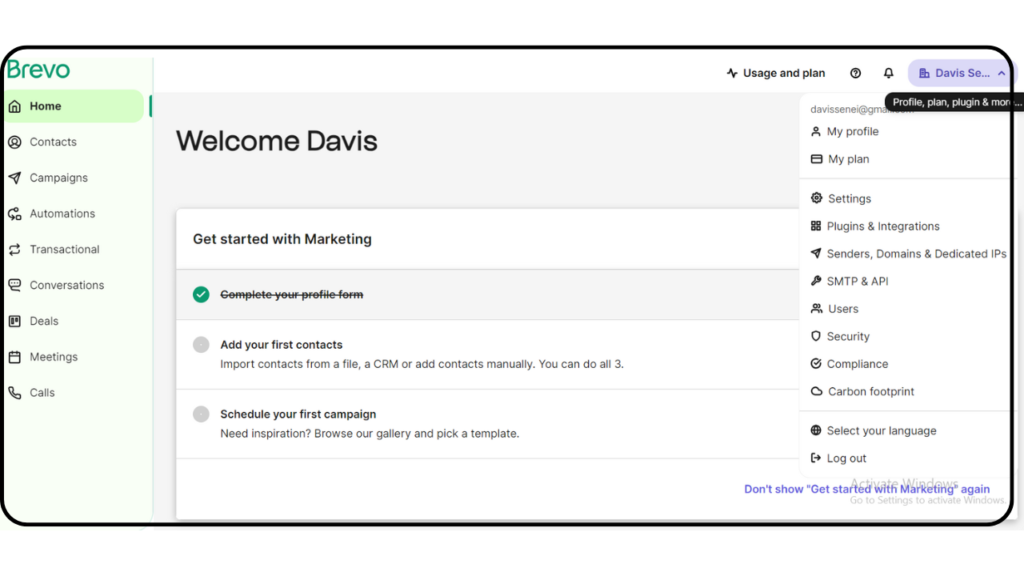
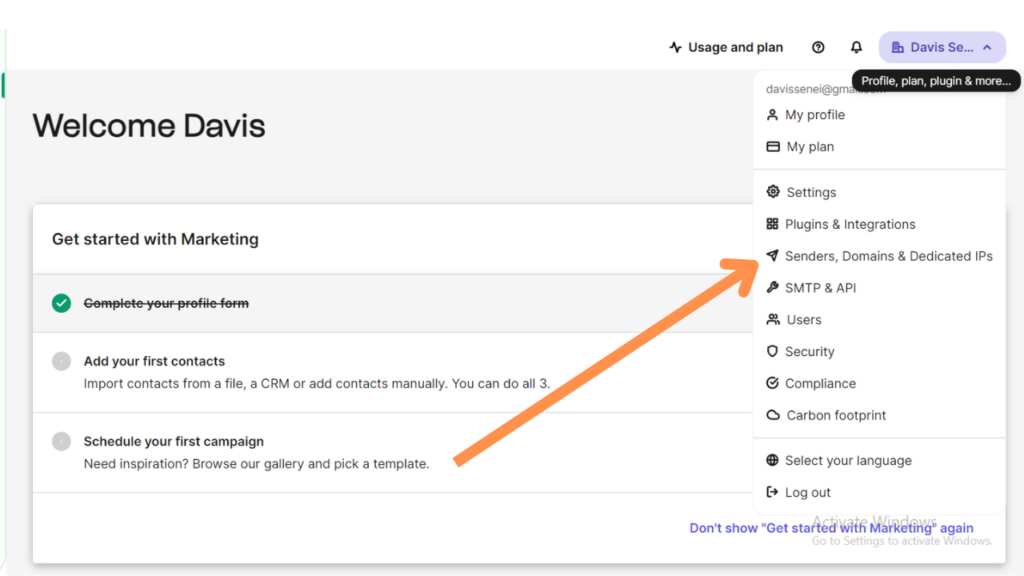
2. Access Your SMTP Settings in Brevo
Once your account is set up, you’ll need to access your SMTP settings.
- Log in to your Brevo dashboard.
- Navigate to the SMTP & API section, which can be found under the Transactional tab.
- Here, you’ll see your SMTP server details, including the server address, port, and login credentials.

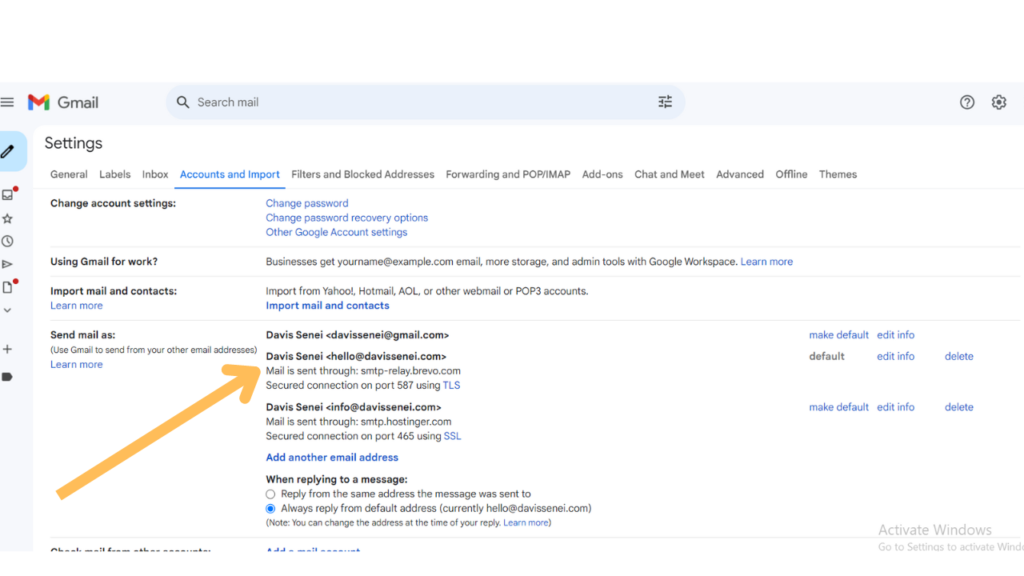
3. Configure Your Application or Website
Next, you’ll need to configure your application, website, or email client to use Brevo as the SMTP server. Here’s how:
- Server Address: Enter the SMTP server address provided by Brevo (usually
smtp-relay.brevo.com). - Port: Use port 587 for TLS or port 465 for SSL. These ports are standard for secure email transmission.
- Username: Enter the SMTP username provided by Brevo, typically your Brevo login email.
- Password: Enter the SMTP password generated in your Brevo dashboard.
- From Email Address: This should be a verified email address in Brevo that you’ll use to send emails.
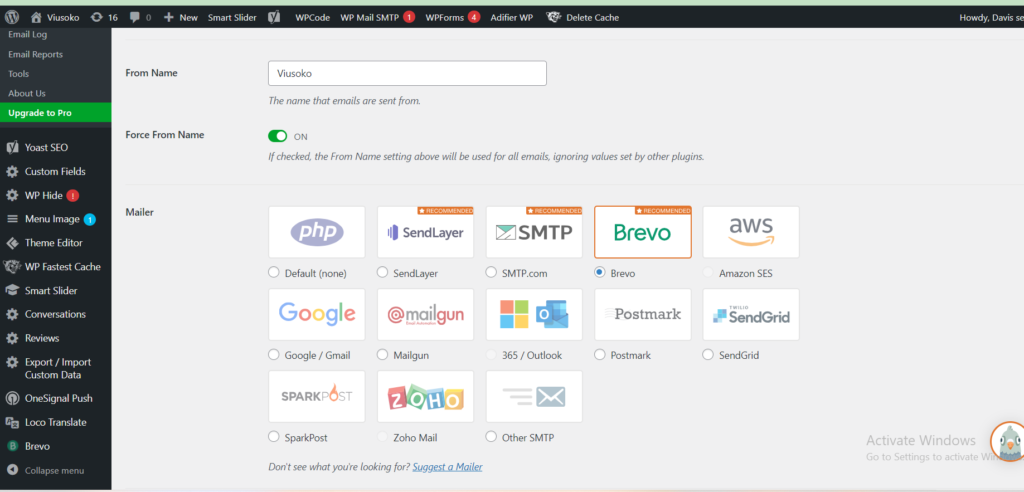
If you’re using a CMS like WordPress, you can configure these settings in a plugin like WP Mail SMTP or directly in the code if you’re comfortable with that.
4. Verify Your Domain and Email Address
To improve deliverability and protect your sender reputation, it’s crucial to verify your domain and email address in Brevo.
- In your Brevo dashboard, go to the Senders & IP section under Transactional.
- Add and verify your domain by following the provided instructions. This typically involves adding a TXT record to your DNS settings.
- Verify your email address by sending a test email through Brevo.
5. Test Your SMTP Configuration
After setting up, it’s important to test your SMTP configuration to ensure everything is working correctly.
- Send a test email from your application or website to ensure it’s being delivered through Brevo.
- Check the Brevo dashboard for delivery status and any errors that might need troubleshooting.
Troubleshooting Common Issues with Brevo SMTP Setup
Even with the correct setup, you might encounter some issues. Here’s how to address common problems:
Authentication Errors
If you’re getting authentication errors, double-check your SMTP username and password. Ensure that you’re using the correct credentials provided in the Brevo dashboard.
Emails Not Sending
If your emails are not sending, verify that your server settings (address, port, and encryption type) are correct. Also, check that your domain and email address are verified in Brevo.
Emails Landing in Spam
If your emails are landing in spam, ensure that your domain is properly authenticated with SPF, DKIM, and DMARC records. You can configure these in your DNS settings and then test them using email deliverability tools.
Conclusion
Using Brevo as your SMTP server is a powerful way to ensure reliable email delivery, whether for transactional emails, marketing campaigns, or daily communications. By following the steps outlined in this guide, you can easily set up and start sending emails through Brevo. If you encounter any issues, the troubleshooting tips provided should help you resolve them quickly.
Need expert assistance with setting up Brevo SMTP? Contact us today for professional support!